 |
 |
|||||||||||||||||||||
|
||||||||||||||||||||||
Preparing Images for Submission to AZFO.org
Images coming directly from digital cameras are large in size and difficult to e-mail, post to or view from the web. Listed below are techniques for reducing the size of the files without lessening the quality of your images.
There are three primary ways of saying how large a digital image is:
- the total pixels recorded at the time of exposure, usually in megapixels (MP)
- the amount of disk space a file takes up, typically measured in kilobytes (KB) or megabytes (MB)
- the number of pixels wide by number of pixels high (W x H) displayed on screen
The following is a three-step process used to convert a large original to an image small enough for e-mail and downloading, yet still retaining essential content. We prefer images that are less than about 1000 X 800 pixels and less than 300 KB in size. The steps to make this transformation are:
- Cropping
- Resizing
- Compression
These are fairly straight-forward procedures for digital photographers, and should be options in most image processing applications. The examples shown here were done in Adobe Photoshop.
Cropping
Cropping is the first step in reducing the size of any image. Cropping selects a portion of an image and discards the rest. Cropping is the first step because it has no effect at all on image quality. AZFO posts documentation photos and we prefer those that are tightly cropped to the bird, but it is usually more esthetically pleasing to leave a little "air" behind the bird and little more in front of it. If you want to preserve your image quality but reduce the image size for posting, crop as much as you can.
Find the cropping tool in your image processing application and use it to make a selection from the image, tightening up the original to the most critical portion and eliminating the non essential surrounding area.
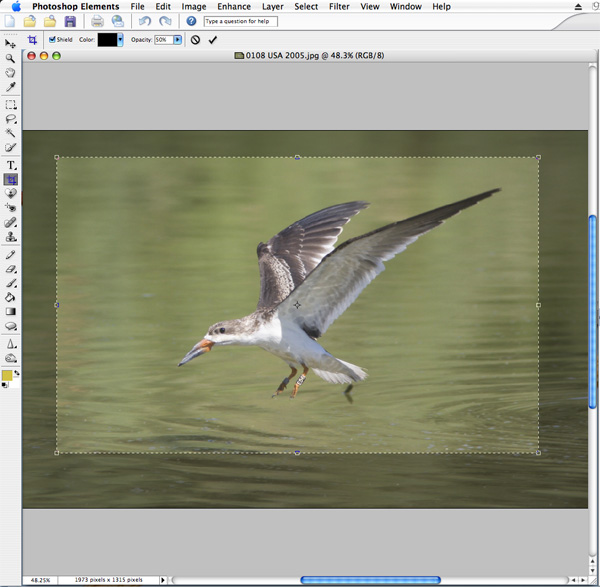
The crop tool has been selected from the tools menu on the left side and used to draw a crop box on the image. The area that will be discarded is darkened; the crop box can be adjusted before committing to the actual crop.
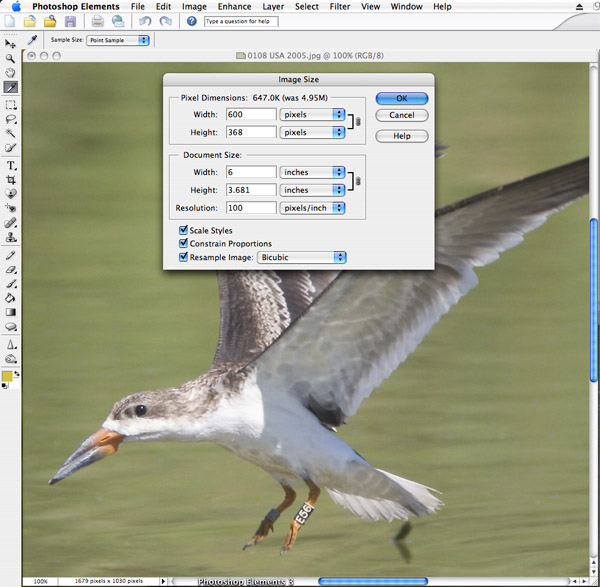
Resizing
Once extraneous material has been eliminated by cropping, the overall dimensions of the image should be reduced by resizing. An image that is 4000 x 3000 pixel W x H can be reduced in size to 1000 x 800 pixels by discarding 3 of every 4 pixels in every horizontal and every vertical line. This step is essential to reduce the image to a size that is comfortable to view on the web. To preserve image quality, crop as much as possible first. The image quality will be reduced by this step and the image may get a little softer and require some sharpening.
Select Image Size or Resize from the menus in your application and change the long dimension to 800 pixels. Note that you want to keep the proportions the same to avoid a squeezed distortion. Choose "bicubic" or "bicubic sharper" if it is offered.
NEVER increase the dimensions of an image. For example, if you crop a distant photo to 300 x 175 pixels it will look much better posted at that size than if increased to 1000 x 800. Increasing the number of pixels adds interpolated pixels which almost always degrades the image.
Compression
The final step in reducing the size of an image for web viewing is setting jpeg compression. This is a visual "trick" that discards subtle information in the image to yield files that take mush less physical storage (KB). Images can be easily compressed by 10:1 or so without any significant visual loss to image detail.
Compression comes into play when you perform a "Save As" action on the file. Select "jpeg" as the file type, and then adjust the quality slider to get a file size of 60-300 KB.
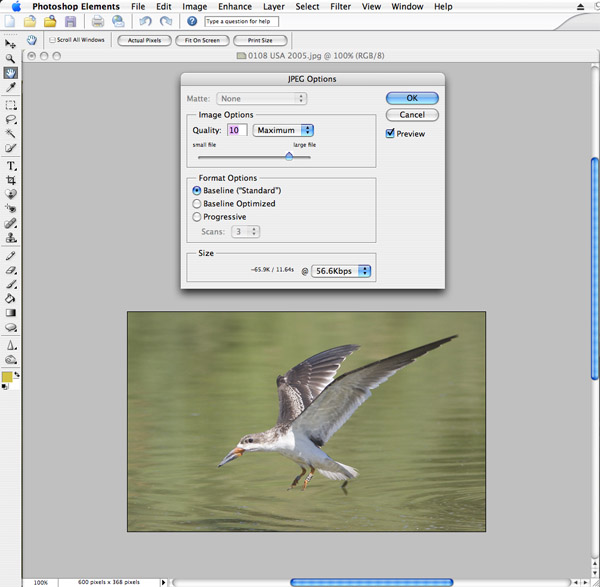
Your file is now ready to submit and has been reduced to a size that will be easy to view on the web even for those with dial up connections but that still maintains nearly all of the original quality of your original. Most of the information you discarded in the above steps is necessary to preserve detail in very large prints but does not affect how an image appears when viewed at the typical resolution of most computer monitors.
|
©2005
|
HOME | | | REPORT SIGHTINGS | | | PHOTOS | | | BIRDING | | | JOURNAL | | | ABOUT US | | | CHECKLISTS | | | AZ BIRD COMMITTEE | | | EVENTS | | | LINKS |